Wednesday 25 September 2013

More inspiration from Greek Women

A member of the Global Greek Women group on linkedin posted this inspiring article about the power of the collective. This article is another example of women getting together to cook and make a living. Please read and share this article with everyone who loves women and loves to cook. For the foodies of Toronto I pose a question. How can we get their products to Toronto?

Village Women cooking and making a living
Some of the products these wonderful women make.


The village square.

Where Trikeri Village is located.

Tuesday 24 September 2013

Cookisto - Greek Women Cooking for the Community

This morning as I was surfing my home page on Facebook I came across this interesting and inspiring article about Greek women cooking for their families but also feeding people in the community. Now that Greeks are experiencing tough times, the citizens of Athens are being creative with ways to make money. I love the idea of housewives cooking for their families and selling portions of the meal to other Athenians that do not have the time to cook or who cannot cook. Ingenious!

Read it for yourselves and share it. Perhaps we need something like this in Toronto.

http://www.bbc.co.uk/news/magazine-24163742

http://www.bbc.co.uk/news/magazine-24163742

Monday 23 September 2013

Chili Fries

Chili Fries

Last Thursday, I was craving some pub food but since we hardly go out these days what with having two babies and all I thought I would make pub food at home instead. A couple of weeks ago, my good friend Susan came over for a play date and brought a tupper full of chili. This was very thoughtful of my friends because having a new baby and an toddles is a lot of work. Sometimes juggling two babies and making dinner is near impossible sometimes, so the chili was perfect last week. The pre-made chili made my meal preparations much more simpler and quicker. I just had to bake up the wedge fries, heat the chili and shred the cheese. Presto! Chili Fries. 

For the Chili recipe, my friend Susan will be supplying the website with that. As for the wedge fries simply cut the potatoes in wedges. From a large potato I got 9 wedges. Dress the wedges in canola oil, salt and pepper. Bake in a 450F preheated oven on a baking sheet for 45 minutes. To plate the Chili Fries distribute the wedges evenly as to how many plate you are plating, spoon on a couple of ladles of Chili and top with a heap of shredded marble cheddar cheese. 

Saturday 21 September 2013

Salmon and Spinach Penne Casserole

Salmon and Spinach Penne Casserole

This particular dish takes me back to my visit to Bielfeld, Germany in 2005. While vacationing in Greece that same summer and attending my cousin's wedding, I decided to take advantage of the close distances of neighbouring European countries. I had contacted my friends Timo and Liane to ask them if they were going to be around in the summer and after planning the perfect dates for my visit, I booked a flight to Dusseldorf, Germany where Timo met me to whisked me away to the town of Bielfeld. During my one week visit, Liane had invited us to her apartment for lunch. On the menu was this delicious pasta casserole originating from Sweden. Salmon and Spinach Casserole. The combination of the meaty Salmon and the tender sauteed spinach goes very well together with a mixture of cheeses and pasta. One of my all time favourites. Not only do I enjoy this dish every time I make it but I am also reminded of the happy times I spend with my friends, Timo and Liane. 

3 cans of skinless and boneless salmon
1 bunch of spinach
1 bunch of green onions
1 tbsp minced garlic
1 package of penne pasta
1 cup milk
4 tbsp Parmesan cheese
juice of 1 lemon
125 g mozzarella cheese, grated
salt
pepper
1 tsp sage
1 tsp thyme
1/2 tbsp mint
1 cup Italian bread crumbs

1. Boil the penne for 10 minutes or until al dente. Drain and reserve 1 cup of pasta water.

2. Saute the green onions and spinach until tender. Sprinkle with salt and pepper.

3. In a deep casserole dish or dutch oven spoon in the salmon and pour 1/2 of the lemon juice. Break the salmon into pieces. Season with salt and pepper.

4. Meanwhile, make the sauce. In a small mixing bowl combine the milk, 1/2 of the lemon juice, 2 tbsp Parmesan cheese, sage, thyme and mint.

5. Once the pasta is finished cooking add the pasta to the casserole dish. Then add the sauteed spinach. Mix salmon, pasta and spinach together. Add pasta water.

6. Last, pour on the sauce and combine well. Sprinkle on 2 tbsp of the Parmesan cheese and bread crumbs.

7. Bake in a 425F preheated oven for 30 minutes.

Six Degrees Wine

Six Degrees White Wine paired with Salmon and Spinach Penne Casserole

Every now and then the Wine Rack at our neighbourhood Superstore features a new wine from an up and coming winery. Last week, they featured Six Degrees Red and White from the Niagara Region. Since I can consume wine now that I am sans baby in the belly I sampled both the Red and White. The wine that made into my shopping basket was the White; a combination wine of Riesling and Gewürztraminer. The combination of the dryness of the Riesling and the sweetness of the  Gewürztraminer was a pleasant surprise and I paired it well with my Salmon and Spinach Penne Casserole. 

Food Processor Magic

About a week ago, I posted about my new toy - the Kitchen Aide Food Processor my sister picked up for one her to trip to Florida. Well, today I am sharing with you the joy I had slicing flank steak for my Lomo Saltado. It was like Food Processor magic. I had partially thawed the flank steak and then separated the steak into 4 even portions. The flank steak at Costco is packed in such a way that it is folded into a nice neat package, mostly for the convenience of storing 2 pieces of flank steak on 1 tray. Brilliant! Anywho, following the instructions in the food processor manual I set out to slice the steak. Within in seconds I had evenly sliced pieces of flank steak which is the secret to a tender and terrific Lomo Saltado. Truly, my Lomo Saltado this time was "the bomb" as my pleased hubby proclaimed as he dug into his plate the other night.

Wednesday 18 September 2013

Patates Bloom

Patates Bloom

Potatoes. Everyone loves potatoes. Although the conquering of the Americas by Spain in the 1500s resulted in the destruction several hundreds types of potatoes in Peru, thankfully some of the species brought back to Europe survived and today we can enjoy them in a variety of different ways. My Dad loves his potatoes. Mash them. Boil them. Fry them. Roast them. My Dad will eat them. By far his favourite potato dish come from his hometown Kozani. This dish has a funny name. Patates Bloom because the potatoes swim in a zesty tomato sauce. Growing up Patates Bloom was served regularly with many meat dishes from Keftedes to Kotopoulos Psito. Often my Mom made this dish during Easter lent because the potatoes were filling. Now that I have my own family, I have introduced this dish to my husband Rafael who loves his potatoes as much as my Dad if not more since he is Peruvian. Not only is this side dish hearty but super simple to make.

1/2 bag mini yellow potatoes
1 large onion, diced
1 tbsp garlic
2 cups tomato pulp
salt
pepper
1 tbsp paprika
1/2 tbsp mint
1 cube chicken / vegetable stock
4 cups water
olive oil


1. In a medium stock pot heat a good helping of olive oil and saute the onion and garlic. Slowly add the seasonings: salt, pepper, paprika and mint.

2. Once the onion is softened add the potatoes. Mix together and pour in the tomato pulp and water. Add the chicken stock.

3. Bring to a boil and then simmer for 30 to 40 minutes or until potatoes are cooked through.

Monday 16 September 2013

Butter Chicken Quesadillas

Butter Chicken Quesadillas

Every now and then every home cook needs a day off from the kitchen and for those days pre-made meals are perfect. Often these prepared dinner ideas only need 30 minutes  to be reheated or cooked through. You can purchase these dishes in any supermarket. I love the selection at Costco. Not only do they have a wide variety of dishes to choose from but the quantities is enough to feed a family of 4 to 6. A couple of weeks back I purchased their Butter Chicken. It was delicious! When we first heated it up I paired the Butter Chicken with Basmati Rice and a fresh garden salad. Luckily there was plenty leftover to enjoy on another day. Seeing how I usually do not like to eat leftovers I tend to create new dishes from the leftovers. This time I married the Latino Chicken Quesadilla with Indian Butter Chicken and the the Butter Chicken Quesadilla was born. I must say that this marriage of cultural flavours is surprisingly delicious. 

2 cups of pre-made Butter Chicken
3 large tortilla shells
2 cups shredded marble cheddar cheese
1 red onion, sliced
1 red pepper, sliced
2 tbsp salsa verde*
canola oil

1. Preheat oven to 425F.

2. Meanwhile saute the red onion and red pepper in a non-stick pan. Set aside.

3. To assemble the quesadilla first place one tortilla shell on a baking sheet. Next spoon on the Butter Chicken. Make sure to have an even layer of chicken. Cover with another tortilla shell. Then spoon on the salsa verde, sauteed onion and pepper mix. Last cover with shredded cheese and the last tortilla shell.

4. Before placing the quesadilla in the oven brush on some canola oil for the top to crisp up but not to burn. Bake for 25 to 30 minutes.

* If you don't have salsa verde you can use any good quality salsa.

Peruvian Dinner - Tallarines Verdes

Tallarines Verdes

Peruvian Dinner

To celebrate the harvest season at the Karipidis home, I decided to make one of my favourite Peruvian dishes while using my Mom's Pesto that we had made from her basil a few days before. A Peruvian dinner is never complete without a cold glass of Inca Cola. Thankfully, our local grocery store - Fresh Co carries my husband's favourite soft drink and so we were able to enjoy a completely Peruvian Dinner with all the fixings.

1 package of linguine
2 cups of pesto
200g of Parmesan cheese
1 lbs flank steak
1 tbsp soy sauce
1 tbsp white wine vinegar
1 tbsp minced garlic
canola oil
1/2 tbsp cumin
1/2 tbsp oregano

1. Mix the soy sauce, vinegar, garlic, canola oil, cumin and oregano together to create the marinade for the steak.

2. Place the flank steak in a roasting pan and pour the marinade over the flank steak. Bath the flank steak with the marinade and place in the refrigerator for a few hours.

3. Boil the linguine for 10 minutes. Strain but keep 1 cup of the pasta water. In the same pot that you boiled the pasta you can mix the pesto sauce. Return the pasta to the pot and immediately spoon on the pesto, add the pasta water and combine together so that the pesto coats all the pasta. Sprinkle with 100 g of the Parmesan cheese.

4. You can either barbecue the flank steak or you can roast it in the oven. To roast it in the oven place the marinaded flank steak on a rack. Preheat oven to 450F. Cover the roasting pan with foil and roast for 30 minutes. After 30 minutes remove the foil, flip the flank steak on the other side and baste with the pan juices. Reduce heat to 425F and return the pan to the oven so that the steak can brown.

5. To plate this dish first spoon on a good helping of the tallarines, sprinkle with Parmesan cheese and add 3 to 4 slices of the flank steak. 

6. Serve with Inca Cola for a true Peruvian dinner experience.

Wednesday 11 September 2013

Tilapia Tacos

Tilapia Tacos

4 fillets of tilapia
2 tbsp soy sauce
juice of 1 lime
1/2 tbsp minced garlic
1 tsp oregano
1 tsp cumin
1 tsp chili paste
salt
pepper
1 red onion, sliced
1 red pepper, sliced
200g shredded marble cheddar
4 tbsp salsa verde
4 large tortilla shells

1. Preheat oven to 425F.

2. Mix together in a small mixing bowl the soy sauce, lime juice, garlic, chili paste, oregano, cumin, salt and pepper. Marinade the tilapia with the soy sauce mixture. 

3. In a non-stick pan saute the red onion and red pepper. Set aside.

4. Place the fish in a baking dish, cover with foil and bake the tilapia for 30 minutes.

5. After 30 minutes uncover, lower heat to 400F and continue to bake for another 15 minutes to allow the juices to evaporate. The tilapia should be slightly bathed in juices but not swimming in it.

6. To serve place one fillet on each tortilla. Then spoon on 1 tbsp of salsa verde. Next top with a good helping of the sauteed onions and peppers. Last sprinkle on the shredded cheese. Eat! Enjoy!

Tuesday 10 September 2013

My New Toy

Kitchen Aid Food Processor
Not to long ago, my sister brought me back a Kitchen Aid Food Processor to shorten my prep time when I'm making my empanadas. I have to say that this the best small appliance I have used. It chops, slices and shreds like a champ. Last week, I kicked my new toy in high gear. Aside from the pesto I sliced all the vegetables and shredded all the cheese I needed for my Chorizo Empanada filling. My prep time was chopped in half. Not to mention that I saved tons of money shredding my own cheese. Never again am I going to buy shredded cheese in a bag. My Kitchen Aid Food Processor shredded the cheese to perfection. Now I can make my own cheese combination just like Trestelle or the other leading cheese companies make. I want to thank my wonderful sister for bringing the Kitchen Aid Food Processor back from her long trip to sunny Florida. Your the best Efi!
Shredded Marble Cheese

Saturday 7 September 2013

Peanut Chicken with Noodles

This dish was inspired by a recipe that I had received through my subscription to All Recipes.com. The original recipe is called Sesame Chicken Salad and it is to be served cold as a salad. Since I was missing two major ingredients in the Sesame Chicken Salad recipe, I decided to change it up a bit. First I substituted the sesame seeds for peanuts and instead of serving it cold, I served it hot.

Peanut Chicken with Noodles

2 chicken breasts, sliced thin
2 tbsp soy sauce
1 tbsp minced garlic
1 tbsp white wine vinegar
1 tsp sugar
1 tsp chili paste
pepper
canola oil / sesame oil
1 package of noodles
1 red pepper, sliced thin
1 bunch green onions, chopped thin
1/2 bunch cilantro, chopped

1. In a medium size mixing bowl stir together the soy sauce, garlic, vinegar, sugar, chili paste and pepper for the marinade. Add the chicken and refrigerate until ready to cook.

2. Meanwhile boil the noodles for 10 minutes if you are using standard pasta such as I did. If you are using Chinese noodles follow the instructions on the package.

3. In a wok heat the canola oil and add the chicken. Stir fry for 7 to 10 minutes on high heat. Push to the side of the wok.

4. Add the red peppers and onions. Stir fry for 5 to 7 minutes than gradually combine the chicken pieces with the vegetables. Lower heat to medium.

5. Ladle in the pasta once it is cooked through. Pour some of the noodle water into the wok to help the contents from getting too dry. 

6. Lower heat to low and sprinkle in the cilantro. Taste at this point. You may want to add more soy sauce at this point. 

Friday 6 September 2013

Value Pack Cooking

In today's tough economy house cooks around the world are looking for ways to make the grocery bill stretch. I remember reading once that housewives in Greece were using Lays Potato Chips  to add to their dishes. Anything is possible if you think outside the box to save money. More and more these days leading grocery markets are tapping into the tough economy and offering customers "Value Packs". These are essential big ticket items in large quantities. Last weekend, I bought a value pack of chicken breasts at Fresh Co. Usually I would use all the pieces in one dish however this week I decided to stretch that value pack of chicken into several dishes.

The package of chicken breast I bought had 5 large boneless, skinless chicken breasts ready for cooking. From this package of chicken I made four recipes all in one day. Yup! I was a busy little housewife yesterday. Here is a list of all the dishes I made.

Dish #1 - Simple Chicken & Rice Soup

Dish #2 - Spicy Chicken Salad Sandwich Filling

Dish #3 - Roasted Chicken Breast

Dish #4 - Peanut Chicken with Noodles


For my son, Alejandro I made a Simple Chicken & Rice Soup instead of my usual Greek style chicken and rice soup to save time.

1 chicken breast
1 small onion
salt
water
1 cube chicken stock
1/2 cup arborio rice

1. Boil the chicken breast and onion in a small stock pot for 30 minutes. Season with salt.

2. After 30 minutes remove chicken, throw in the cube of chicken stock and bring the soup base back up to a boil. Add the rice and continue boiling for another 30 minutes on medium-low heat. Stir together so that the rice doesn't stick to the bottom of the pot.

3. Meanwhile shred the chicken into bite size pieces. My son likes his chicken to be shredded really tiny. Once the rice has boiled add the chicken back into the pot.

4. If the soup is too thick boil 2 cups of water separately and add to the soup. 

As I was shredding the chicken I soon realised that the amount of chicken I had for Alejandro's soup was too much for the little guy so I separated the chicken into two equal parts. It is amazing how much chicken you can get from shredding. One portion I used for the soup and the other for a Spicy Chicken Salad Sandwich Filling. 1 tbsp mayonnaise, 1 tbsp prepared mustard, 1 tsp chili paste. Mix together and spread it on your favourite sandwich bread. Done!

Next dish I made was a simple Roasted Chicken Breast that I will use for my Classic Chicken Empanada Filling.

2 chicken breasts
canola oil
1/2 tbsp paprika
1/4 tbsp oregano
1/4 tbsp cumin
salt
pepper

First, I preheated the oven to 425F. Then I marinated the chicken breasts with the canola oil and seasonings in a square baking dish until the oven was ready. I covered the baking dish with foil and roasted the chicken for 30 minutes.


The other recipe follows on the next posting. Stay tuned for my Peanut Chicken and Noodles.


Harvest time

Everytime around this time of year it is Harvest time at the Karipidis Residence. Ever since we moved into a house back on Granger Avenue, my parents have kept a simple vegetable garden with all the essential Greek vegetables every household should have on hand. Now that we moved from the Junction to the St.Andrew's Community my parents continue their harvesting tradition. Back at the old house our garden grew tomatoes, cucumbers, eggplant, zucchini and your standard array of herbs. The people who owned the new house before we did build a beautiful patio that has built-in herb beds where my Mom's herbs grow in an abundance. This year such as last year my Mom's basil was overgrowing. Of course my Mom was delighted with all the basil she had in her herb beds but was overwhelmed with what to do with so much basil. I suggested we make pesto. And so we did. With the help of my handy dandy food processor we made enough pesto to last use at least 3 to 4 dishes worth of the basilly goodness.

VENETIA'S PESTO

10 cups of basil and parsley combined leaves
3 tbsp minced garlic
1 cup of pine nuts
3 cups of walnuts
300 g Parmesan cheese
juice of 1/2 lemon
olive oil (a lot)
salt

You will want to use a heavy duty food processor or blender to prepare the pesto so that all the ingredients blend well together. You may have to make 2 separate batches at a time and mix the two together in a large bowl at the end of the process. We started by chopping the nuts first and poured a good helping of olive oil to start to create a good paste. Then we slowly added the herbs small batches at a time followed by the cheese. When we saw that the paste was getting too thick we added the lemon juice, minced garlic, salt and more olive oil. Once the ingredients are mixed well together transfer the pesto to sterilised mason jars and refrigerate. 

Thursday 5 September 2013

Vegetarian Wednesdays

VEGETARIAN WEDNESDAYS

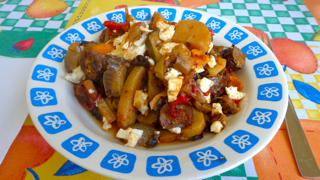
Tourlou - Roasted Summer Vegetables
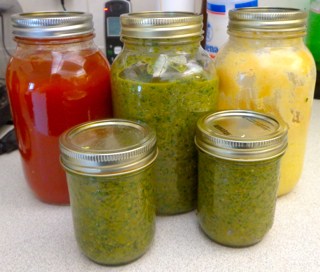
Every Monday, Wednesday and Friday is Vegetarian nights at the Herrera Family for one important reason - to introduce more vegetables into our diet so that we are healthy, strong and fit. Of course, there is nothing more satisfying than a BBQ steak to a carnivore like myself but once in awhile every lioness needs her helping of grub to keep everything working properly. Even my cat Lucky likes to chow down on fresh green beans. Honest! Scouts honour! Yesterday, being Wednesday was a double vegetarian day. I had my Mom's Tourlou for lunch and my Gigantes for dinner. Both dishes were so well prepared that I didn't think once about meat. Not to mention, my Mom's Tourlou rocked yesterday because everything aside from the potatoes and the feta came from her garden.

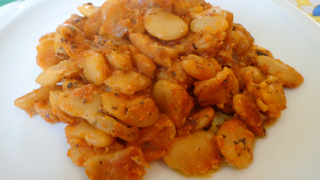
Gigantes - Baked Lima Beans
Venetia's Tourlou

1 large eggplant, halved and sliced
1 large zucchini, halved and sliced
1 large red pepper, halved and sliced
1 large green pepper, halved and sliced
1 large red onion, halved and sliced
4 to 5 garlic cloves, diced
1 large sweet potato, halved and sliced
2 large yellow potatoes, halved and sliced
2 large tomatoes, sliced
salt
pepper
olive oil
1 bunch of mint, chopped
1 bunch of fresh oregano, chopped
1 bunch of parsley, chopped
1 cup tomato pulp
1 cup boiled water
200 g feta

1. Cut all the vegetables in 1/4 inch thickness and place in bowls. It is a good idea to place the eggplant in a bath of water and vinegar to let out the iodine from the eggplant.

2. Preheat oven to 425F. In a large roasting pan layer the vegetables in the pan all listed in the ingredient list.

3. Pour the boiled water and tomato pulp over the vegetables before adding the fresh tomato slices. Season generously with olive oil, salt and pepper. Cover with foil and roast for 45 minutes.

4. After 45 minutes reduced the heat. Remove from the oven and press the vegetables down with a cooking spoon. Add the fresh herbs and place back into the oven for another 20 minutes.

5. After 20 minutes put the oven to broil for another 20 minutes for the vegetables to crisp up a bit.

6. To reheat the Tourlou sprinkle on crumbled feta and enjoy with crusty bread.


Gigantes

3 cans of Lima beans, drained and washed
1 large onion, diced
1 tbsp minced garlic
1 tbsp paprika
1/2 tbsp oregano
1/2 tbsp mint
1/2 tbsp cumin
salt
pepper
1 cup tomato pulp
olive oil
1 cup of boiled water

1. Preheat oven to 425F.

2. In a frying pan saute the onion and garlic for 3 to 4 minutes. Season with the paprika, oregano, mint and cumin. Pour in the tomato pulp and let simmer for 5 to 7 minutes on medium heat to evaporate some of the liquid from the tomato pulp.

3. Meanwhile place the Lima beans in a rectangular baking dish and pour the boiled water over the beans.

4. Add the sauteed onion mixture to the baking dish. Cover with foil and bake for 45 minutes.

5. Uncover the baking dish after 45 minutes. Reduce the heat to 400F and continue baking for another 15 minutes to allow some of the juices to evaporate. You want the gigantes to be saucy but not soupy.

Chorizo Succatash

Chorizo Succotash

As this is the second week of our new meal plan, I am finding that not only is it helping me to stay on track of my post-preggo diet but it's helping to twiddle down my grocery bill. I only buy what I need for the week and use up all the groceries in my fridge and pantry. For Tuesday's dinner I made a Chorizo Succotash since my Mom had brought me a tray of corn which was not on my grocery list but I felt bad not using it. With half of the amount of chorizos from the value pack tray, I made this simple and tasty dish and the other half I'm going to cook up for my Chorizo Empanada filling. Economising is the name of the game in today's economy when you are cooking for a family.

6 mild chorizo links
4 corn cobs
canola oil
1 cup of pre-cooked rice
1 large red onion, sliced
1 tbsp minced garlic
1/2 tbsp oregano
1/2 tbsp cumin
salt
pepper
soy sauce
1/2 bunch of cilantro, chopped

1. Preheat oven to 450F. Brown the chorizo in the preheated oven for 30 minutes. This will make slicing the chorizo easier.

2. Boil the corn for 30 to 40 minutes.

3. Allow the chorizo and corn to cool down for a few minutes before slicing into bit size pieces.

4. To cut the kernels from the cob, place the wide end of the corn cob on a cutting board and run your knife along thte middle of the cob and the kernels. Place kernels in a bowl.

5. In a wok or deep fry pan saute the chorizo pieces until brown on both sides.

6. Push the chorizo to the side and the sliced red onions. Saute for 2 to 3 minutes then add the garlic. Mix together with the chorizo.

7. Season with the oregano, cumin, salt and pepper. 

8. Add the pre-cooked rice and corn to the wok. Pour in te soy sauce and saute together for a few minutes until the rice heats through.

9. In the last couple of minutes of cooking thrown in the cilantro.


Sunday 1 September 2013

Beet & Aragula Salad

Beet & Arugula Salad

I have to thank my Mom and Stefano Faita for this delicious salad of Beets and Arugula. First, I want to thank my Mom for introducing me to this salad last week as I launched into my post preggo diet. Second, I want to thank Stefano Faita who shared this refreshing salad on his cooking show - In the Kitchen with Stefano Faita; which my Mom was watching one fateful afternoon. The combination of the sweet beets and bitter arugula is nicely balanced with the briny feta and tangy vinaigrette. We paired it with roasted chicken for a low carb - high protein lunch and it hit the spot until dinner time.

1 bunch of arugula
2 large beets, boiled, peeled and sliced
100 g feta, crumbled
olive oil
white wine vinegar
salt
pepper
1 tsp mustard powder


Politiko Meatloaf

Politiko Meatloaf

After the birth of our second son, I have decided not only to go back to the Doctor Daniels diet to lose my post preggo pounds but to get my family to eat less meat and more vegetable based meals. To introduce more vegetables into our diet I've been making meat based dishes on alternate days. Not only is this allowing me to trim down my waist but also on my grocery bill. With that said and with being a cave woman down to the very blood of me, I cannot go without a good dose of meat in my diet every now and then. Thus, the creation of Politiko Meatloaf was created on Thursday. In the beginning the ground meat mixture I made was going to be used to make Keftedes - Greek Meatballs. However, my husband was not very excited with the prospect of eating meatballs for a second time that day. You see, I packed meatballs and pasta for his lunch. Of course the poor man didn't want to eat the same dish twice even though the meatballs he had for lunch were Italian meatballs and I was going to make Greek meatballs. To men one meatball is the same as the next meatball, so with that in mind I decided to get a little creative with my ground meat mixture. Instead of crafting the ground meat into golf ball size meatballs and frying them in a pan, I rolled the ground meat mixture into a log type shape and stuffed into a loaf dish and voila - the Politiko Meatloaf was created.

2 lbs ground meat
1 eggs
2 cups bread crumbs
1 large onions. minced
1/2 cup fresh parley, chopped
1 tbsp minced garlic
1 tbsp cumin
1 tbsp mint
1 tbsp oregano
1 tsp cinnamon
salt
pepper

1 jar Classico Spinach & Cheese Sauce

* You can make your own Marinara Sauce

Kokkinisto - Red Sauce
3 cups tomato sauce
1 onion, diced
1 tbsp minced garlic
1 tsp oregano
1 tsp mint
1/4 tsp cinnamon
1 tsp balsamic vinegar
salt
pepper

1. Place all the ingredients into a large mixing bowl and combine well.

2. Preheat oven to 450F.

3. Line a loaf pan with parchment paper. Roll the ground meat mixture into a log shape and place it into the loaf pan.

4. Spoon on 1/4 of the Spinach & Cheese Sauce on top of the loaf. Cook the loaf for 35 minutes.

5. After 35 minutes check that the loaf has cooked all the way through the middle by poking the loaf with a skewer or knife. Reduce heat to 425F. Add 3 tbsp of the Spinach & Cheese Sauce on top and continue cooking for another 15 minutes.

6. Serve on a bed of pilaf.


Spanakorizo me Kritharaki - Spinach with Orzo

Spanakorizo me Kritharaki - Spinach with Orzo

Spanakorizo is a traditional Greek vegetarian dish popular during Lent because the spinach is a good source of iron and the rice makes a hearty dinner option when you don't have meat in your bowl. Usually Spanakorizo is made with rice, however in different regions of Greece other grains have been used as well such as Bulgar wheat, barley or kritharaki (orzo pasta). Last week was the first week that I started cooking differently for the family mostly because I've put myself on a post pregnancy diet and partly because I want to introduce more vegetarian based meals into our eating schedule for all around better health. Thus our eating schedule is as follows; Monday, Wednesday and Friday I make vegetarian dishes and Tuesday, Thursday and Sunday I make something with meat. Saturdays is our leftover day. The dish that I am sharing with you today is from our Wednesday night dinner.

1 bunch of baby spinach, chopped
1 bunch of green onions, chopped
1 tbsp minced garlic
salt
pepper
1/2 tbsp mint
2 cups of tomato pulp
2 cups of chicken stock (vegetable stock)
1/4 cup orzo pasta

1. In a medium size stock pot saute the green onion for 2 to 3 minutes.

2. Add the spinach and cover to allow the spinach to wilt.

3. Stir in the minced garlic, salt, pepper and mint. Saute together for 3 minutes.

4. Stir in the tomato pulp and chicken stock. Bring to a boil. Add the orzo pasta. Cook for 30 minutes on medium/low heat.

5. Serve with crusty bread.